> ## Documentation Index
> Fetch the complete documentation index at: https://docs.mention-me.com/llms.txt
> Use this file to discover all available pages before exploring further.
# Your first dashboard
> Build a dashboard from scratch in five minutes.
This tutorial walks you from an empty dashboard to a working one with two metric tiles and a chart. It assumes you have Reporting access.
If you want the fastest possible path, [start from a template](/knowledge-v2/referral/reporting/get-started/using-templates) instead. To let AI assemble the dashboard for you, see [build with AI](/knowledge-v2/referral/reporting/get-started/ai-dashboard-builder).
 ## 1. Open Reporting
Go to **Referral → Reporting**. You land on the dashboards list, which shows every dashboard your team has created.
## 2. Create a blank dashboard
Click **New dashboard**. A dialog opens with three paths. Click **Blank dashboard** underneath the AI prompt box.
You now have an empty dashboard with a filter bar along the top.
## 3. Add your first metric tile
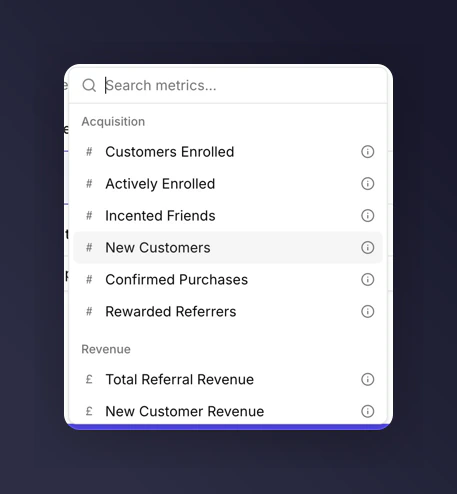
Click **Add tile** (or press `A`). In the tile editor:
1. Pick **Metric** as the tile type.
2. Search or scroll for **New Customers** in the metric picker.
## 1. Open Reporting
Go to **Referral → Reporting**. You land on the dashboards list, which shows every dashboard your team has created.
## 2. Create a blank dashboard
Click **New dashboard**. A dialog opens with three paths. Click **Blank dashboard** underneath the AI prompt box.
You now have an empty dashboard with a filter bar along the top.
## 3. Add your first metric tile
Click **Add tile** (or press `A`). In the tile editor:
1. Pick **Metric** as the tile type.
2. Search or scroll for **New Customers** in the metric picker.
 3. Leave the title blank (the tile will autogenerate one) or give it your own.
4. Click **Save**. The tile lands on the grid.
## 4. Add a chart
Click **Add tile** again. In the tile editor:
1. Pick **Chart** as the tile type.
2. Keep the chart subtype as **Line**.
3. Add **Total Referral Revenue** as the metric.
4. Click **Save**.
You should now see a line chart next to your New Customers metric.
## 5. Change the time period
In the dashboard filter bar at the top, open the time period dropdown. Switch from **Last 30 days** (the default) to **Last 90 days**. Both tiles update in place.
Every tile on the dashboard now follows this time period. See [filters and time periods](/knowledge-v2/referral/reporting/building-dashboards/filters-and-time-periods).
## What you just built
A dashboard answering "how is the programme doing in the last 90 days?". Add a comparison and you'll be able to answer "is it getting better?". Add a campaign breakdown and you'll be able to answer "which campaigns are pulling their weight?".
## Where to go next
* Want the chart to compare versus last year? See [comparisons](/knowledge-v2/referral/reporting/building-dashboards/comparisons).
* Want to split it by campaign or market? See [breakdowns](/knowledge-v2/referral/reporting/building-dashboards/breakdowns).
* Want to rearrange the tiles? See [editing the layout](/knowledge-v2/referral/reporting/building-dashboards/editing-layout).
3. Leave the title blank (the tile will autogenerate one) or give it your own.
4. Click **Save**. The tile lands on the grid.
## 4. Add a chart
Click **Add tile** again. In the tile editor:
1. Pick **Chart** as the tile type.
2. Keep the chart subtype as **Line**.
3. Add **Total Referral Revenue** as the metric.
4. Click **Save**.
You should now see a line chart next to your New Customers metric.
## 5. Change the time period
In the dashboard filter bar at the top, open the time period dropdown. Switch from **Last 30 days** (the default) to **Last 90 days**. Both tiles update in place.
Every tile on the dashboard now follows this time period. See [filters and time periods](/knowledge-v2/referral/reporting/building-dashboards/filters-and-time-periods).
## What you just built
A dashboard answering "how is the programme doing in the last 90 days?". Add a comparison and you'll be able to answer "is it getting better?". Add a campaign breakdown and you'll be able to answer "which campaigns are pulling their weight?".
## Where to go next
* Want the chart to compare versus last year? See [comparisons](/knowledge-v2/referral/reporting/building-dashboards/comparisons).
* Want to split it by campaign or market? See [breakdowns](/knowledge-v2/referral/reporting/building-dashboards/breakdowns).
* Want to rearrange the tiles? See [editing the layout](/knowledge-v2/referral/reporting/building-dashboards/editing-layout).